The Ribbon is a common feature of modern Windows applications, and it replaces the Menu bar and Toolbar used in older versions of EMu. The Ribbon organizes commands into tabs (Home, Edit, View, Tools, etc.) and within a tab into logical groups of commands (Search, View, Select, etc.).
Which commands are currently available in the Ribbon depends on whether you are searching, adding a new record, displaying records or editing a record (see Screen mode for details).
-
Not all commands are available in every module, and some commands are contextual and only display under certain circumstances: for instance, the Field tab only displays in the Ribbon when the cursor is in a field; the Archives tab only displays in the Catalogue module when the Object Type is Archive.
- If a command in the Ribbon has an arrow head beside it (
 in the File tab) or below it (
 any other tab), selecting the command will reveal a second level of commands.
 - Place the cursor over a command to display a descriptive label and, if available, a keyboard shortcut for the command:
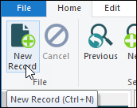
- If an option is greyed out (faded), it is unavailable as its function is not currently relevant (for instance, Cancel in the image above is greyed out until an action that can be cancelled has been performed); or you are not authorized to use it.
This section describes all commands available in all modules and in all modes. Some tabs in the Ribbon are always present, some display depending on the current context (the Field tab displays when the cursor is in a field for instance). Some options only display for suitably authorized users; some tabs may share the same name but may include different options. All of these variations are noted below.
Tabs always present
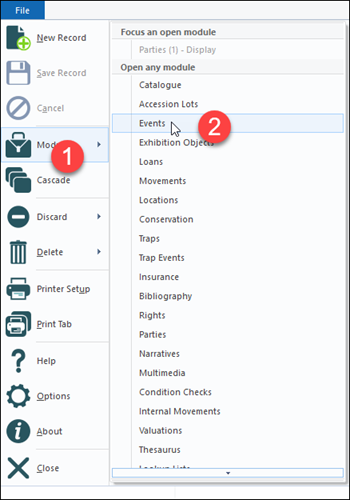
Unlike the other tabs in the Ribbon, the File tab operates like a traditional menu, with commands listed in a vertical column rather than horizontally in a tab:
| Command | 2nd level |
Shortcut |
Description |
|---|---|---|---|
|
|
|
CTRL+N |
Add a record to the module. The module enters New mode and clears all fields except for default values. |
|
|
In certain modules it is possible to create an attachment record from the current record. Enabled in:
|
||
|
|
|
Save the current record. |
|
|
Cancel |
|
Esc |
Cancel the current operation (search, edit, or new record before it is saved). |
| Modules | Focus an open module |
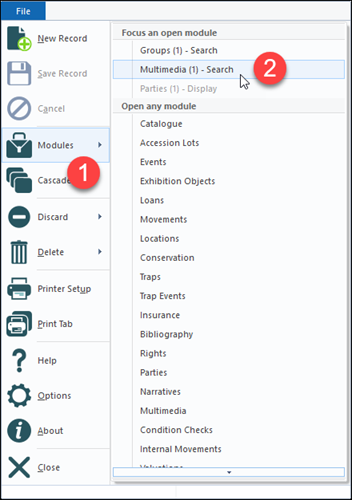
A list of all open modules and their current screen mode displays beneath this heading. Select a module name in the list to bring it to the front of all other modules (giving it "focus"): |
|
|
Open a favourite module |
|
If a module has been added to the Favourites in the Command Centre, select a module name from the list to open it: |
|
| Open any module |
A list of all modules you are authorized to access displays beneath this heading. Select a module name from the list to open it: It is not possible to open another instance of an open module with this method. If you select a module from the list that is already open, you simply give it focus (i.e. bring it in front of any other open modules). Tip: To open another instance of an open module, hold down the keyboard See How to open and close modules for more details. |
||
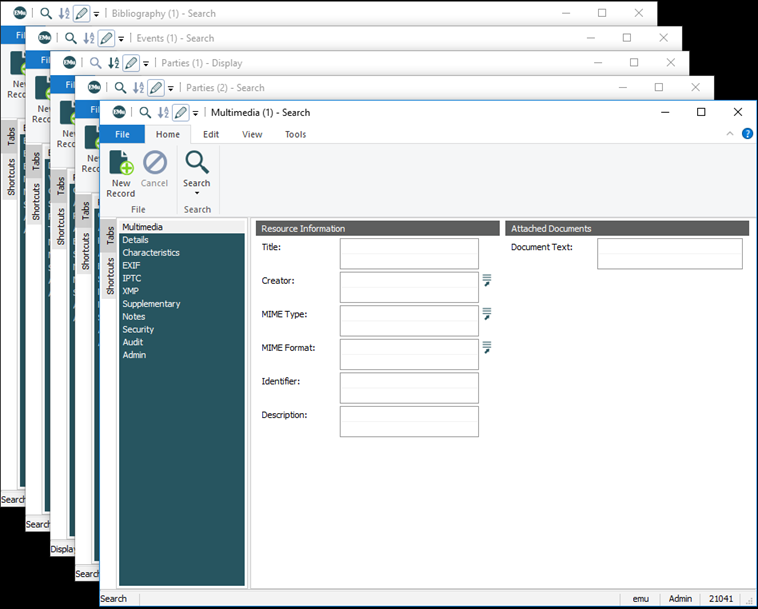
| Cascade |
Select this option to cascade all open module windows, placing them one on top of the other and staggered so that the Title bar of each module is visible: Tip: Click a module Title bar to bring the module to the front of all others. |
||
|
Current Record Selected Records |
|
Discard either the current When a record is discarded from a group of records, it is only removed from the current result set. It is not removed (deleted) from the database. Note: The |
|
|
Current Record Selected Records |
|
Delete either the current When a record is deleted from a group of records, it is permanently removed from the database. Tip: Use with care! |
|
|
Printer Setup |
|
|
Open the Print Setup dialogue box in order to select a printer and / or configure a printer. |
|
|
|
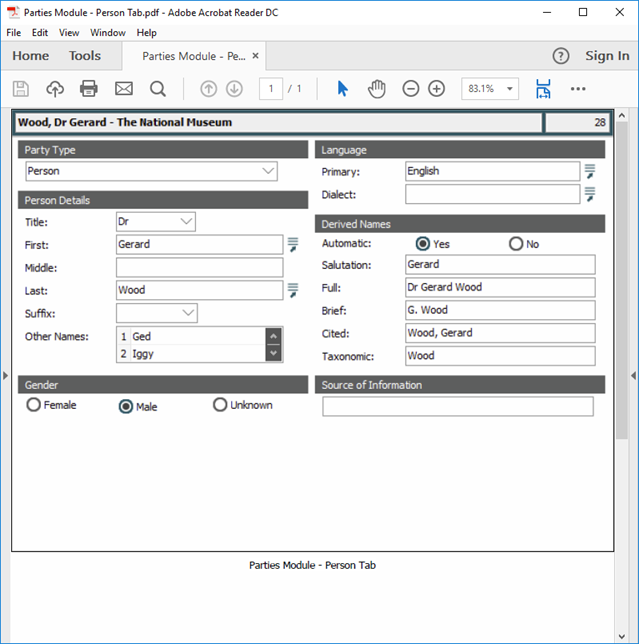
Print everything currently displaying in the Display pane. If in Details view, the Summary Data and IRN will also print. In this example, the Display pane was printed to PDF: |
|
| Help | Launch the EMu Help. | ||
| Options |
Select this command to display the Options dialogue box and customize the EMu user interface and certain system settings. See Setting System and User Interface options for details. |
||
| About |
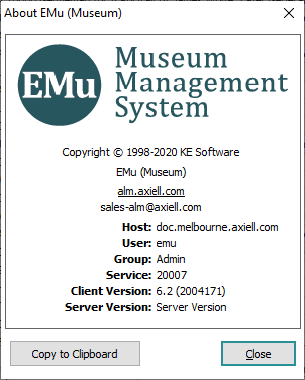
Displays EMu identification information, including Host, Service, Client and Server Version numbers:
When dealing with Axiell Support you may be asked to provide this information. You can use the Copy to Clipboard button to copy the information and paste it into an email or Support ticket. See What is my version of EMu? for details. |
||
|
Close |
|
|
Close the current module. |
Which commands are available on the Home tab depends on the current screen mode, i.e. whether you are searching, adding a new record, displaying records or editing a record.
Search mode:
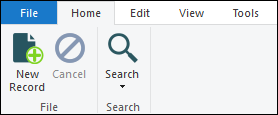
Display mode (you've searched for records, retrieved a group of records, etc.):

New mode (a new record has been added) and Edit mode (an existing record has been changed):

|
Group |
Command | 2nd level |
Shortcut |
Description |
|---|---|---|---|---|
|
File |
|
CTRL+N |
Add a record to the module. The module enters New mode and clears all fields except for default values. Available in all modes. |
|
|
|
|
Save the current record. Available in New and Edit modes. |
||
|
Cancel |
|
Esc |
Cancel the current operation (search, edit, or new record before it is saved). Available in all modes. |
|
|
Search
|
|
|
Run a search. Available in Search mode. |
|
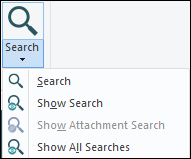
|
|
Displays the TexQL Query Statement of a search in the current module (i.e. excludes attachment fields). The Query Statement can be edited. |
||
|
|
Displays the TexQL Query Statement of a search that will run in an attached module. There must be a search term in the attachment field and the cursor must be in the field. The Query Statement can be edited. |
|||
|
|
Displays the current search criteria in TexQL format, including any searches that will run in any attached modules. The Query Statement can be edited. |
|||
|
|
|
Return to Search mode, keeping any values that were entered in the last search. Available in Display, New and Edit modes. Tip: If changes to a record have not been saved, you will have the option to save or cancel the changes. |
||
|
|
|
Enter or return to Search Search mode, clearing all values from fields except for default search values. Available in Display, New and Edit modes. Tip: If changes to a record have not been saved, you will have the option to save or cancel the changes. |
||
|
Merge Intersect Subtract |
|
Run a second search and combine the results in one of three ways, ADD, OR or NOT. Available in Display, New and Edit modes. Tip: If changes to a record have not been saved, you will have the option to save or cancel the changes. |
||
|
View |
|
|
|
All View options are available in Display, New and Edit modes. |
|
|
|
|
Display records in List View. |
|
|
|
|
|
Display records in Contact Sheet View. |
|
|
|
|
|
Display records in Page View. |
|
|
|
|
|
Display records in Details View. |
|
|
|
|
|
When records have been returned by a search, retrieved from a group and / or just added to the module, use these buttons to move through the record set. See How to move through a group of records for details. |
|
|
|
|
|
Move to the first record in the record set. |
|
|
|
|
|
Move to the previous record in the record set. |
|
|
|
|
|
Move to the next record in the record set. |
|
|
|
|
|
Move to the last record in the record set. |
|
|
|
|
|
When records have been returned by a search, retrieved from a group and / or just added to the module, the Go to Record utility can be used to move to a record in the current list of records. For example, it is possible to move directly to record 35 of 40 records. See How to move through a group of records for details. |
|
|
Tools |
|
|
|
All Tools options are available in Display, New and Edit modes. Tip: If changes to a record have not been saved, you will have the option to save or cancel the changes. |
|
|
|
Display the Sort dialogue. Select an existing sort with which to sort records returned by a search, retrieved from a group and / or just added to the module, or create a new sort. |
||
|
|
|
Run, edit or create a report. |
||
|
|
|
Check the spelling of the selected records. |
||
|
|
|
|
All Select options are available in Display mode only. |
|
|
|
|
|
Select all records currently displaying in the module. |
|
|
|
|
|
Deselect all records. |
|
|
|
|
|
Select the current record |
|
|
|
|
|
When the current record |
|
|
|
|
|
Note: All other records will be deselected. |
|
|
|
|
|
Invert the selection, i.e. records selected become unselected and records unselected are now selected. |
The Edit tab includes the following commands in all screen modes:

|
Group |
Command |
2nd level |
Shortcut |
Description |
|---|---|---|---|---|
|
Clipboard
|
Paste |
|
|
Paste text currently saved to the clipboard. |
|
Cut |
|
|
Copy selected text to the clipboard and delete it. |
|
|
Copy |
|
|
Copy the selected text in a field, or records in a List View. |
|
|
|
|
Copy selected records in List View and specify what the Line / Row character (delimiter) will be when pasting into Microsoft Excel. Can be useful if a column selected in List View is for a table of values (e.g. Other Names: (Person Details) in the Parties module. See The Copy Special utility for details. |
||
|
Edit |
Undo |
|
|
Undo the last edit. |
|
Redo |
|
|
Redo the last edit removed. |
|
|
Current Record |
|
Return the current record to a previous state. |
||
|
Selected Records |
|
Return one or more records to a previous state. |
||
|
Clear |
|
|
Clear the current field of any content. Note: In a multi-language environment, all data is cleared from the field even if only a single language is set to display. |
|
|
Clear Group |
|
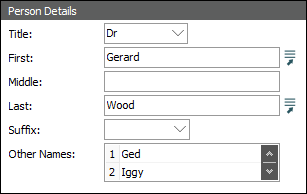
A Group Box is one or more fields grouped under a heading. For example, in the Parties module, there is a Person Details Group Box with six fields:
The Clear Group command clears all values from a Group Box when the cursor is active in one of the fields in the Group Box. |
||
|
|
In Search mode, clear all search values entered in all fields (this includes default values |
|||
|
|
|
Display the Replace box. The Global Replace tool permits authorized users to replace one or more values across one or more records. From the Replace box it is possible to specify substitutions to run (and / or run an existing substitution). See Global Replace for details. |
||
|
|
|
Where there are two or more copies of a record, identify the master record (the one to keep) and merge the other copies with it: merging the records ensures that any attachments to the copies are transferred to the master. The copies can then be deleted. Note: The Merge records function does not merge data in the obsolete records with the master record. For example if the J. Smith record has an address that is valid for the John Smith record, it is necessary to copy and paste the address manually into the John Smith record. |
||
|
Current Record |
|
Merge the current record with the master record. |
||
|
Selected Records |
|
Merge the selected records with the master record. |
||
|
|
|
Display the Find a Field box. Locate any field in the module and move directly to it. |
||
|
Ditto |
|
|
|
The Ditto utility is used to copy data from:
See The Ditto utility for details. |
|
|
|
Copy data from all fields in the Ditto record |
||
|
|
|
For the current tab only, copy data from the same tab in the Ditto record |
||
|
|
|
For the current field only, copy data from the same field in the Ditto record |
||
|
|
|
Make the current record the Ditto record |
||
|
|
|
Display the Ditto box and select a record to be the Ditto record |
||
|
|
|
Automatically make the last record saved the Ditto record |
||
|
Default Settings |
|
|
|
A default value is a value that has been specified to display in a field when a new record is added to a module or a new search is begun. There can be multiple sets of default values specified for each mode (New or Search) but only one is current in each mode. See Default values and how to make use of them for details. |
|
|
|
The current set of default values for the current mode (New or Search) will be loaded into fields. |
||
|
|
|
Save the values currently entered into fields as a set of default values. |
||
|
|
|
Display the Defaults box and select which set of default values to use. |
The View tab includes the following commands in all screen modes:

|
Group |
Command |
2nd level |
Shortcut |
Description |
|---|---|---|---|---|
|
Tabs |
|
|
|
Select a tab name from the drop list to display the tab in the Display pane. |
|
Display |
|
|
Expand the Summary Data bar and display a thumbnail of the first item of multimedia listed on the current record's Multimedia tab. |
|
|
|
|
Refresh the data in the current or selected records. |
||
|
List Settings |
|
|
|
In List View, records are displayed in a table with one or more columns; each record is a row in the table; each column is a field in the record. It is possible to create your own List Views, specifying which fields to display and to select which List View to use. |
|
|
|
The creator of a List View can resize columns and change the order of columns (via drag and drop); click Save to save these changes. |
||
|
|
|
Display the Field Properties box for the current List View and modify the List View as required. |
||
|
|
|
Display the Fields box and select which List View to use. |
||
|
Page Settings |
|
|
|
Page View is a customizable record display view. The layout and look of a Page View, including which fields display, are specified by creating and modifying a style sheet. There is one Page View by default and others can be specified. |
|
Launch Viewer |
|
|
In Page View, launch a browser in which to display the current record. |
|
|
|
|
Display the Reports box and select which Page View to use to display records. |
||
|
Shortcut Settings |
|
|
|
The left pane of the module window can display a list of field shortcuts and their values. There can be multiple Shortcut lists, each with a different sub-set of fields. |
|
|
Display the Shortcut Properties box for the current Shortcut list and modify it (if you have permission to do so). |
|||
|
|
Display the Shortcuts box and select which Shortcuts list to use. |
|||
|
|
Attachments (links) between records are made from one record (the Primary record) to another (the Target record). A Reverse Attachment traces an attachment back from the Target record to the Primary record. For example, when an object is included in an Event, an attachment is made on the Objects tab in an Events record to a Catalogue record. In the Catalogue record it is possible to display an Events tab that shows the link from the Events record. This tab is a Reverse Attachment tab. Note: If no Reverse Attachment tabs are implemented in a module (Parties for instance), only the Find option will be effective. |
|||
|
|
Current Record |
|
Display the Attachments box with a list of all modules and every field in each of those modules that can attach to the current record. If an attachment exists, it is indicated. From the Attachments box it is possible to open any module and record that made an attachment to the current record |
|
|
Selected Records |
|
As for Current Record, but for one or more selected records. |
||
|
[Module] |
|
With the View Attachments Registry entry it is possible to add modules as sub entries to Find. Selecting a module name will open the module and display all records attached to the current or selected records. |
||
|
|
|
In Search mode, display the reverse attachment tabs. When displaying records, display the reverse attachment tabs for the current record only. The reverse attachment tabs will not display for a subsequent search. When you move to the next record, the reverse attachment tabs will not display. Use Always Show to have reverse attachment tabs display permanently. |
||
|
Show/hide tabs |
|
Note: This option can be set for Search and Display modes separately. In Search mode, display / hide reverse attachment tabs. When displaying records, show every reverse attachment tab (whether there is an attachment recorded on the tab or not). |
||
|
|
When displaying records, do not show reverse attachment tabs. |
|||
|
|
As you move from one record to another, display any reverse attachment tab if there is an attachment recorded on the tab. Tip: Avoid using Show Filled if your connection to the EMu database is slow as it will slow it down even more as all filled tabs for all records will be displayed. The Peek at tabs (F4) command does the same as Show Filled but only for the current record and it may be more efficient to set the Always Hideoption and press F4 for specific records. |
Which commands are available on the Tools tab depends on whether you are searching or displaying records:
Search mode:

Display mode:

|
Group |
Command |
2nd level |
Shortcut |
Description |
|---|---|---|---|---|
|
Language |
EMu can support multiple languages. All prompts, menus, button and data can be displayed in the language selected by the user. See Support for languages for more details. |
|||
|
Language drop list |
Language 1 Language 2 Language 3 |
|
Select a language (or All Languages) to change the display language for the User Interface and data simultaneously. Use a keyboard shortcut to switch to a language: if French is the second language in the drop list, select See How to switch languages for details. Tip: It is possible to change the language used for the User Interface and for data independently in the Options box. |
|
|
Check Spelling |
|
|
Check the spelling of the selected records. |
|
|
|
|
|
A group of records can be sorted on any and all fields in a module (with the exception of nested table fields). You can select a predefined sort or specify exactly how a group of search results will be sorted. You can save the sort criteria you specify for re-use. |
|
|
|
|
Display the Sort box with a list of predefined sorts. Select a sort or create a new sort. See Sorting records for details. |
||
|
|
|
Display the Sort Properties box and specify a sort to use for the current set of records. Tip: You would use an Ad hoc Sort when a Sort hasn't already been defined that meets your needs but you don't need to save the criteria for re-use. |
||
|
Security |
|
|
|
Record Level Security provides organizations with control over who can do what to records on a per user and per group basis. See Record Level Security (RLS) for details. |
|
|
|
The Set Record Security tool is used to apply permissions (view, edit, delete) to multiple records at once. |
||
|
Selected Records |
|
Update the security permissions for one or more selected records. |
||
|
All Records |
|
Update the security permissions for all currently displaying records. |
||
|
|
|
Change the password you use to log into EMu. |
||
|
|
|
|
Available in the Registry module for authorized users only. Run |
|
|
Input / Output |
|
|
Create a batch of records based on an existing record. See Record Templates for more details. |
|
|
|
|
The Import Tool is used to batch import new records and to update existing records in EMu. See The Import Tool for details. |
||
|
|
|
It is possible to schedule the regular export of data and also to export data immediately. Select Export to display the Exports box and select a predefined export to run or edit a predefined export or define a new export. See Exporting records: Scheduled Exports for details. |
||
|
|
|
Display the Reports box to run a predefined report, edit an existing report or define a new report. See How to create and run reports for details. |
||
|
Groups |
|
|
|
After a search has been run you may want to save the group of records returned so that you can access them again; or you may want to save the search criteria used to generate this group of records (especially if the search is quite involved). See Grouping records for details. |
|
|
|
Add one or more records to a new or existing group, or replace the records in an existing group. |
||
|
|
Add the current record |
|||
|
|
Add one or more selected records to a new or existing group, or replace an existing group with the selected record(s). |
|||
| All Records |
|
Add all records currently displaying to a new group or an existing group, or replace an existing group with the current record. |
||
|
|
|
Save the search terms used to locate one or more records. |
||
|
|
|
Display the Restore Group box with a list of static |
||
|
Resources |
|
|
The EMu Resources utility can be used from within a record to:
See Resources for details. |
|
|
|
|
Select a resource. Note: Resources (e.g. Search Google) are defined with the Resource Registry entry. |
Contextual / module specific tabs
These tabs display depending on the current context (the Field tab displays when the cursor is in a field for instance) or only in specific modules.
When an institution adopts one of the Bibliography models introduced with EMu 8, it is possible to populate records with bibliographic information drawn directly from the Biodiversity Heritage Library (BHL). In order to search BHL for bibliographic information an APIs tab is available in New mode:

|
Group |
Command |
Description |
|---|---|---|
| BHL | Search | Search BHL and populate a new record with bibliographic information. |
and Display and Edit modes:

|
Group |
Command |
Description |
|---|---|---|
| BHL | Search | Search BHL and update an existing record with bibliographic information. |
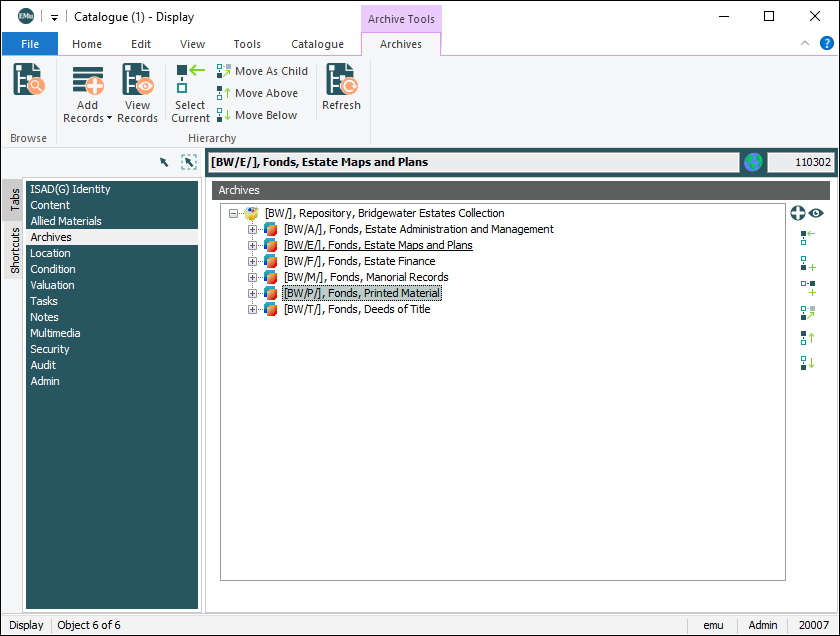
When the Object Type: (Object Details) in the Catalogue module is an archive (e.g. Archive - EAD, Archive - ISAD(G)), various archives tabs are added to the Tabs pane and an Archives tab is added to the Ribbon:

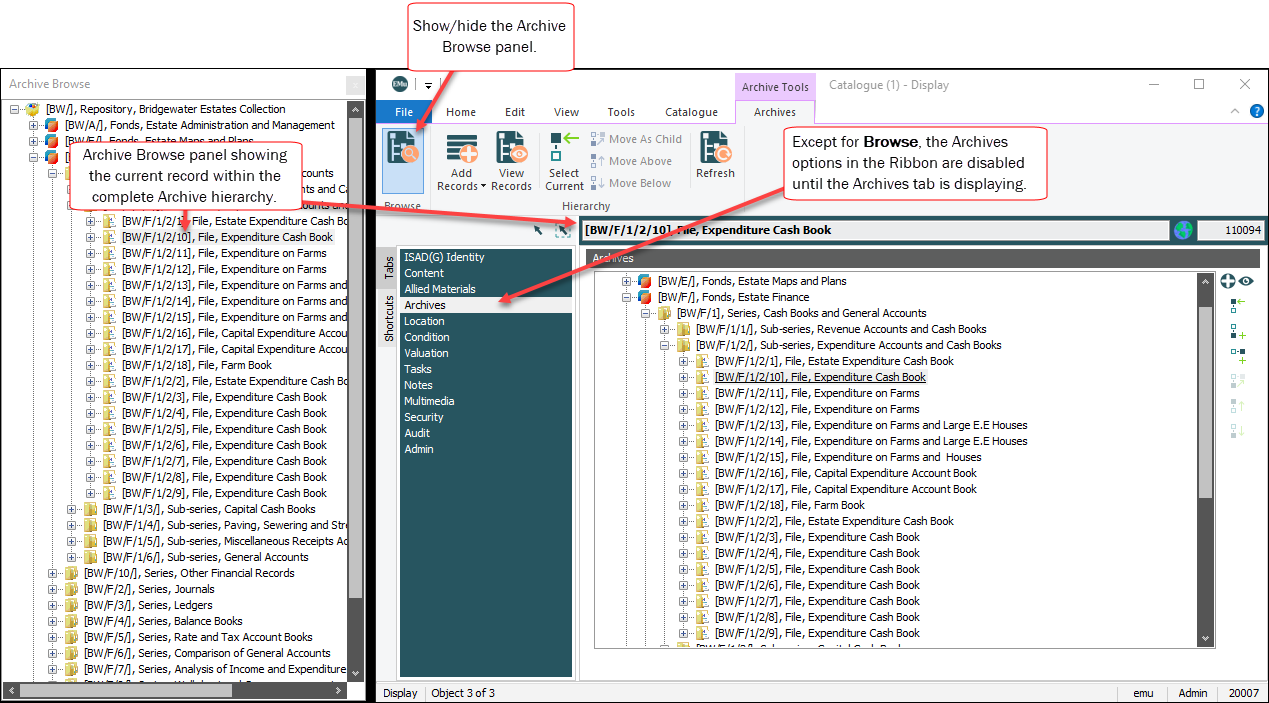
Except for Browse, the other options on the Archives tab of the Ribbon are only enabled when the Archives tab (listed in a module's Tabs pane) is selected in Display mode:
See Archives for details about EMu's Archives functionality.
The following table describes commands available from the Ribbon, and any alternative buttons available beside the Archives hierarchy on the Archives tab:
|
Group |
Command |
2nd level |
Alternative button |
Description |
|---|---|---|---|---|
|
Browse |
Browse |
Show / hide the Archive Browse panel. The Archive Browse panel displays the entire Archive tree for the current record About the Archive Browse panel:
See Using the Archive Browse panel for more details. |
||
|
|
Add Records
|
Add Records |
|
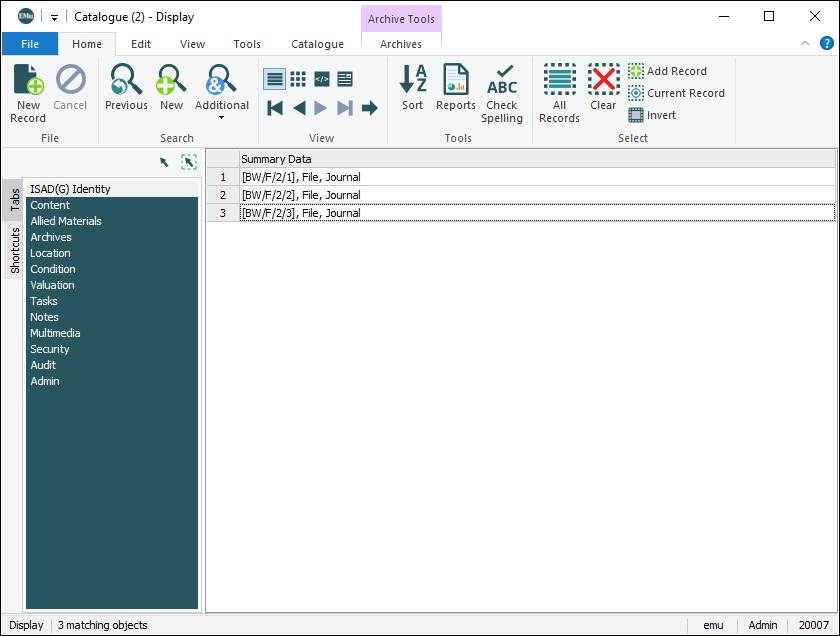
When one or more archives records have been returned by a search or retrieved from a group it is possible to add records to the record set. Three records have been returned by a search:
|
|
Discard |
|
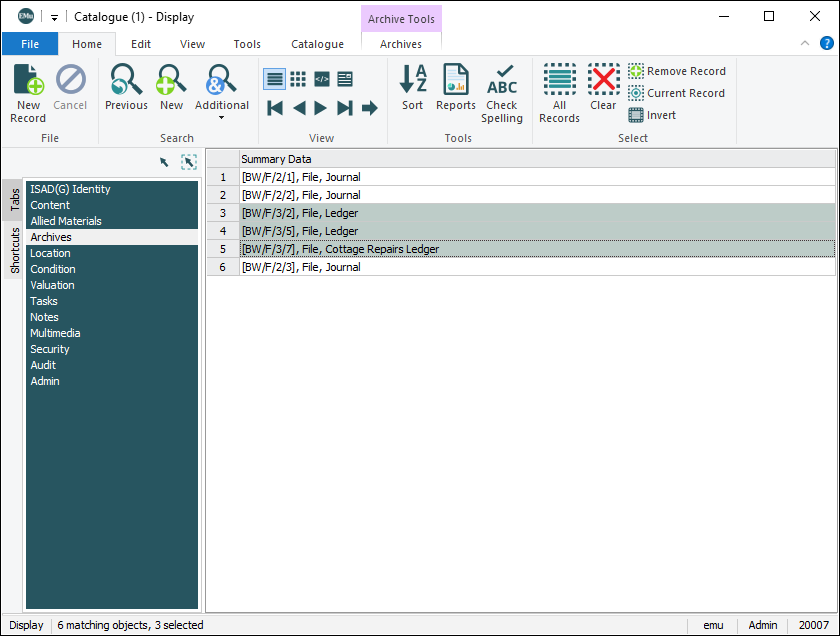
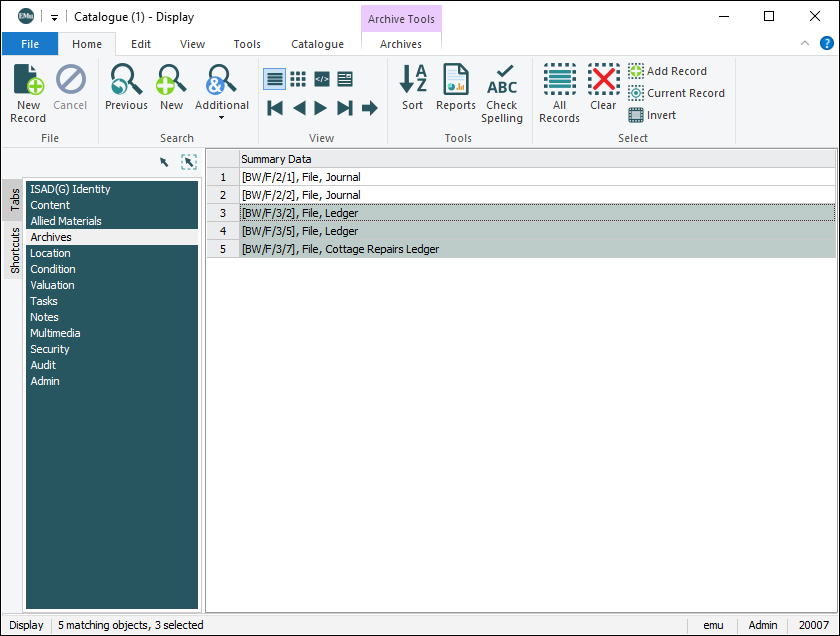
When one or more archives records have been returned by a search or retrieved from a group it is possible to add records to the record set and simultaneously discard the current record. Three records have been returned by a search: In this case, the current record
|
||
|
View Records |
|
|
Select one or more records on the Archives tab and open another instance of the Catalogue module to view their details:
|
|
|
Select Current |
|
|
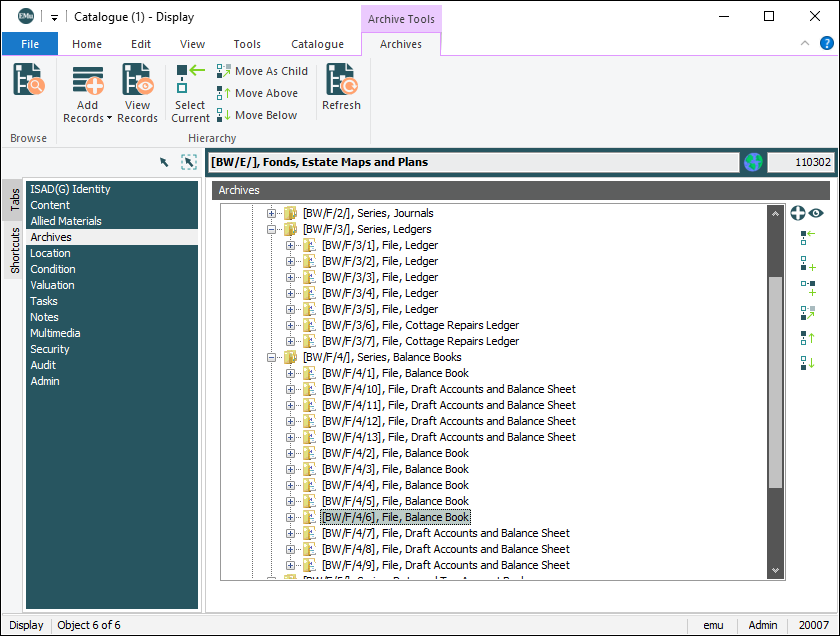
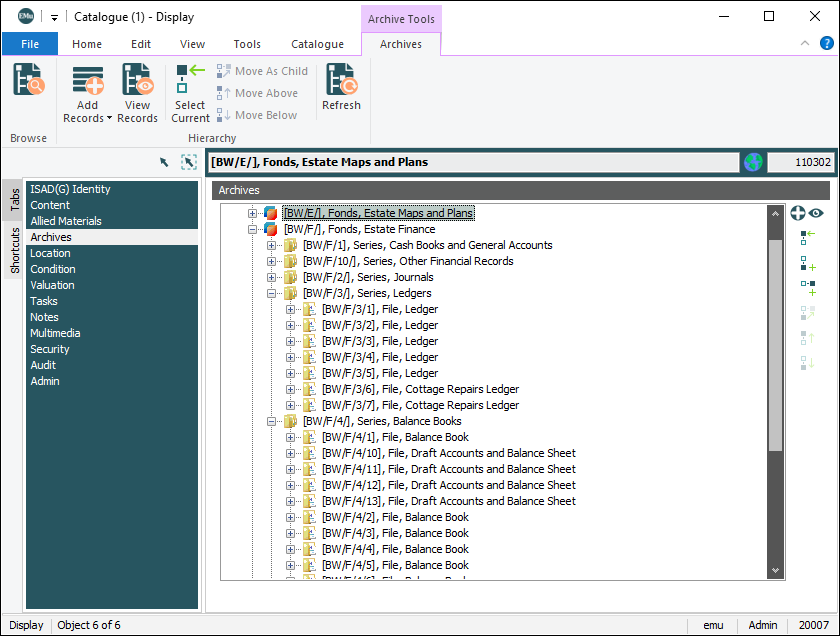
A hierarchy can contain many thousands of items; when drilling down through the items it is a simple matter to return to the current record As we see from the Summary Data
The current record will be revealed in the hierarchy: |
|
|
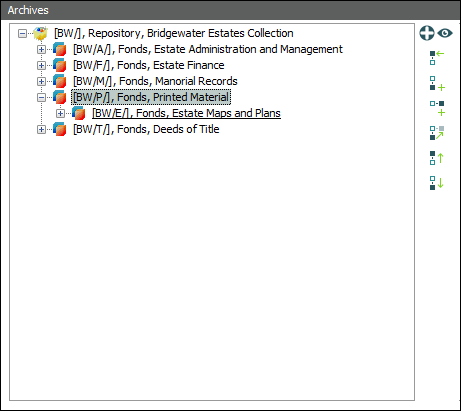
Move As Child |
|
|
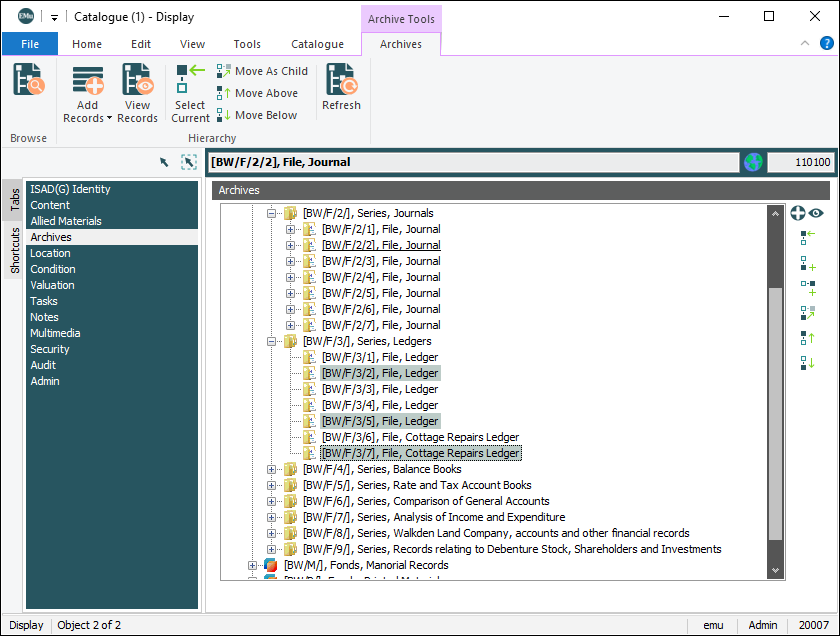
When a record is selected in the hierarchy, make the current record The current record is To make the current record a child of the selected record:
|
|
|
Move Above |
|
|
Move the current record above the selected record. Works similarly to Move As Child (see above) but moves the current record to a position in the hierarchy immediately above the selected record and at the same level in the hierarchy. Note: As this action involves changing the order of items in the hierarchy, the Archive|User Defined Ordering Registry entry must be set to To move the current record above the selected record:
|
|
|
Move Below |
|
|
Move the current record below the selected record. Works similarly to Move As Child (see above) but moves the current record to a position in the hierarchy immediately below the selected record and at the same level in the hierarchy. Note: As this action involves changing the order of items in the hierarchy, the Archive|User Defined Ordering Registry entry must be set to To move the current record below the selected record:
|
|
|
Refresh |
|
|
|
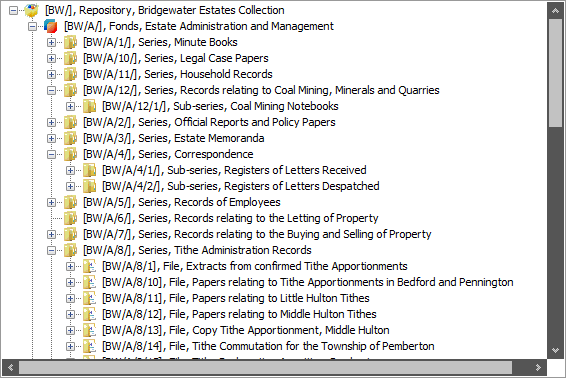
When multiple levels of the hierarchy have been expanded, use Refresh to collapse all levels of the hierarchy, with the exception of any levels required to view the current record. Many levels of the hierarchy have been expanded and the current record is nowhere to be seen:
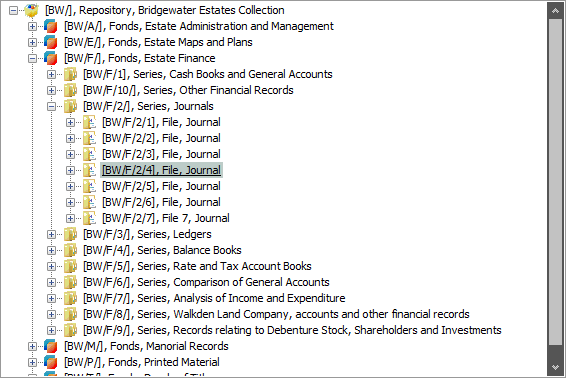
Click Refresh to collapse all expanded levels with the exception of any levels required to view the current record:
|
The Audit tab displays in the Ribbon of the Audit Trails module in Display mode:

| Command |
Description |
|---|---|
|
Select to display changes to fields: if selected (as shown in the image above), the new and old values are grouped together; if not selected, new values are listed first, then old values are listed. |
The Catalogue tab displays in the Ribbon of the Catalogue module:

|
Group |
Command |
2nd level |
Description |
|---|---|---|---|
|
Update
|
Current Record Selected Records |
Update the condition information of the current record or batch update multiple objects. |
|
|
Current Record Selected Records |
Move one or multiple objects from one location to another in a single operation. |
||
|
Current Record Selected Records |
Update the value of one or multiple objects. |
||
|
Current Record Selected Records |
Update taxonomic identification information. Note: Natural History clients only. |
The Events tab displays in the Ribbon of Events modules that use the Exhibition Objects extensions:

|
Group |
Command |
Description |
|---|---|---|
|
Exhibition Objects |
Objects selected in the Objects Associated With Event table of the Objects tab can be moved to another event; associated Exhibition Objects records are simultaneously updated. See How to move objects from one event to another for details. |
The Exports tab displays in the Ribbon of the Exports module in Display mode:

|
Group |
Command |
Description |
|---|---|---|
| Export Files
|
Launch Viewer | Export data files are listed in the Export Files table on the Export tab. Select this option and the name of the file to view the file in the associated application. |
|
Download all files in the Export Files table or select the name of a file to download it. |
The Field tab displays whenever the cursor is in a field.

The Hierarchy tab is added to the Ribbon in the Collection Descriptions module when the Hierarchy tab (listed in a module's Tabs pane) is selected in Display mode:

|
Group |
Command |
2nd level |
Description |
|---|---|---|---|
|
Add Records |
Select one or more records in the Collections hierarchy and add them to the current record set. |
||
|
Select one or more records in the Collections hierarchy and replace the current record |
|||
|
View Records |
|
Select one or more records in the Collections hierarchy and open another instance of the Collection Descriptions module to view their details. The same result is achieved by clicking View Attachments |
|
|
Expand |
|
Select this option to expand the full hierarchy. |
|
|
Refresh |
|
When sub collections are added to a collection or the order of collections is changed, it may be necessary to refresh the hierarchy. |
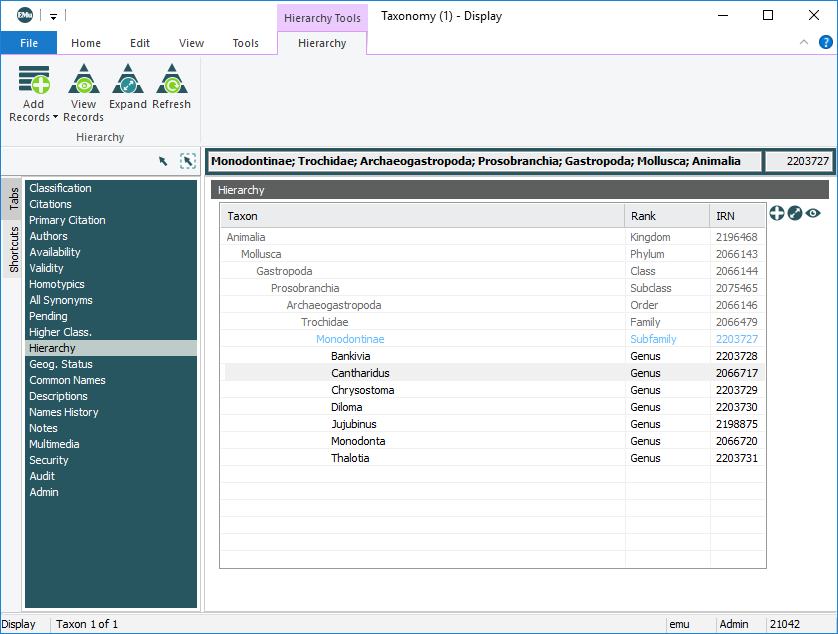
The Hierarchy tab is added to the Ribbon of the Taxonomy module when the Hierarchy tab (listed in a module's Tabs pane) is selected in Display mode:

The Hierarchy tab presents the taxonomic hierarchy of a name:
|
Group |
Command |
2nd level |
Description |
|---|---|---|---|
|
Add Records |
Select one or more names in the hierarchy and add their record to the returned record set. | ||
|
Discard Current |
Select one or more names in the hierarchy and replace the current record |
||
|
|
View the Taxonomy record for any name in the hierarchy:
|
||
|
|
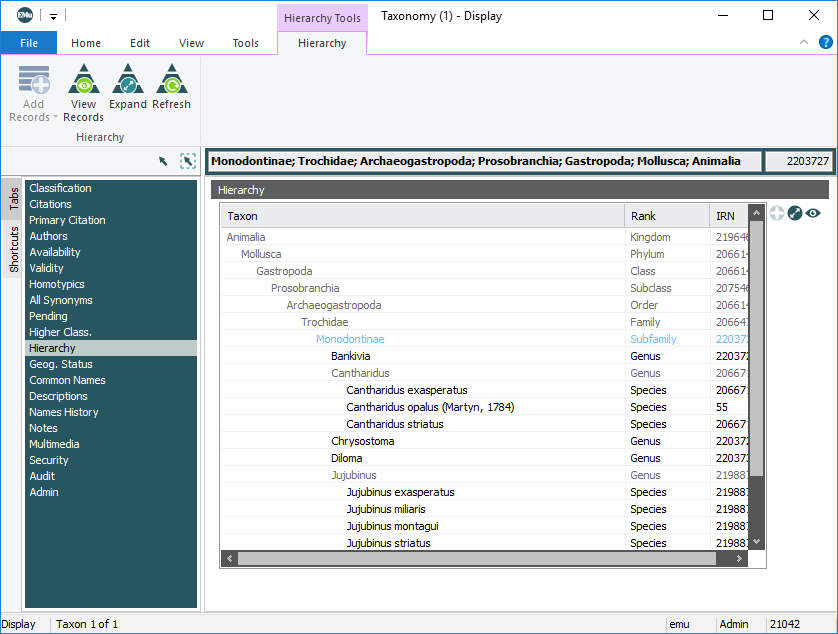
When the Hierarchy tab is selected, the taxonomic hierarchy of a name is presented to one level below the current record (as above). Select this option to expand the full hierarchy: Select again to collapse the hierarchy. |
||
|
Refresh |
|
Select to refresh the hierarchy if changes do not immediately take effect. |
When the Multimedia tab (listed in a module's Tabs pane) is selected in Display mode, a Multimedia tab is added to the Ribbon:

Note: The Multimedia tab in the Ribbon of the Multimedia module includes additional options.
|
Group |
Command |
2nd level |
Description |
|---|---|---|---|
|
Edit |
|
Attach a multimedia resource to the current record. |
|
|
|
Detach the multimedia resource from the current record. |
||
| Scan
|
Scan an image. |
||
|
Set up a scanner. |
|||
|
|
Download the multimedia resource and save it. The drop list can include one or more resolutions and file formats to choose from. |
||
|
View |
Current |
View the currently selected multimedia resource attached to a record in the Multimedia module. |
|
|
|
All |
View all multimedia resources attached to a record in the Multimedia module. |
|
|
Open |
|
Launch an application (on your PC) to view the multimedia resource. |
|
|
Send |
|
Print the multimedia resource in specific format and size, e.g. Certified (Large). |
|
|
Display |
|
View the multimedia resources attached to a record as thumbnails. |
|
|
|
View the multimedia resource attached to a record in a larger view. |
||
|
|
Where more than one multimedia resource is added to the record, move to the first multimedia resource. |
||
|
|
Where more than one multimedia resource is added to the record, move to the previous multimedia resource. |
||
|
|
Where more than one multimedia resource is added to the record, move to the next multimedia resource. |
||
|
|
Where more than one multimedia resource is added to the record, move to the last multimedia resource. |
||
|
Audio/Video |
|
Play the video or audio file. |
|
|
Pause the video or audio file. |
|||
|
Stop the video or audio file. |
|||
|
Rewind the video or audio file. |
The Multimedia module includes a Multimedia tab with the following options:

|
Group |
Command |
2nd level |
Description |
|---|---|---|---|
|
Edit
|
Add a new multimedia resource to the Multimedia module. Resources include: Tip: The 2nd level options are enabled when the appropriate tab (listed in a module's Tabs pane) is selected in Display mode. For example, the Supplementary option is only enabled when the Supplementary tab has been selected. |
||
|
Delete |
|
Delete the multimedia resource from the multimedia repository. |
|
| Scan
|
Scan an image. |
||
|
Set up a scanner. |
|||
|
|
Download the multimedia resource and save it. The drop list can include one or more resolutions and file formats to choose from. |
||
|
|
Current Record |
Used to rebuild the Resolutions / Documents tables based on the files found on the server.
|
|
|
Selected Records |
|||
|
Open
|
|
Launch an application (on your PC) associated with a media type to view the multimedia resource. The drop list includes all available resources (resolutions / documents), including any supplementary resources. |
|
|
|
Launch an application (on your PC) associated with a media type (image, document, etc.) to edit the resource and save changes back to EMu. Note: This option is only enabled when the Multimedia tab (listed in a module's Tabs pane) is selected in Display mode. |
||
|
Send |
|
Print the multimedia resource in specific format and size, e.g. Certified (Large). |
|
|
Resolutions
|
|
Current Record |
Generate a new resolution for one or more multimedia images. |
|
Selected Records |
|||
|
Audio /Video |
|
Play the video or audio file. |
|
|
Pause the video or audio file. |
|||
|
Stop the video or audio file. |
|||
|
Rewind the video or audio file. |
The Operations tab displays in the Scheduled Operations module Ribbon:

|
Group |
Command |
2nd level |
Description |
|---|---|---|---|
| Results
|
Launch Viewer | [result file] | View the result file for a scheduled operation. |
|
|
All |
Save all result files. |
|
|
[result file] |
Save a specific result file. |
The Parties tab displays in the Parties module Ribbon:

|
Group |
Command |
Description |
|---|---|---|
| Synonyms | Add Records | Add all synonym records for the selected records to the existing results list. |
The Parts tabs displays in the Ribbon of the Catalogue module when the Parts tab (listed in a module's Tabs pane) is selected in Display mode:

|
Group |
Command |
2nd level |
Description |
|---|---|---|---|
|
Hierarchy |
Add Records |
Add the selected parts records to the current record set. |
|
|
|
Replace the current record |
||
|
View Records |
|
Open all records that are related as parts to this record. |
|
|
|
When child objects |
Options available on the Registry tab in the Registry module Ribbon enable Administrators to copy the Registry entries associated with an existing group or user to a new group or user:

|
Group |
Command |
Description |
|---|---|---|
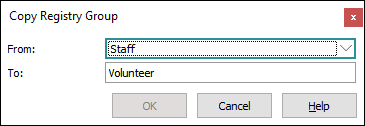
| Group | Copy |
Copy all Registry entries associated with a group to a new group:
A new group is created and all of the Registry entries from the existing group are copied to the new group. |
|
User |
Copy |
Copy all Registry entries associated with a user to a new user. As for Group except that an existing user is selected in the From drop list and the name of a new user is entered in the To field. |
A server-side command line utility, emureg, is also available for advanced Registry manipulation by power users. The utility allows:
-
Listing all known groups or users.
-
Copying all entries associated with a group or user to a new group or user.
-
Renaming all entries associated with a group or user to a different group or user.
-
Removing all entries associated with a group or user.
-
Adding a new user to a group or updating an existing users group membership.
emu-museum@host[1] emureg list-groups
Admin
Archives
Conservation
Staff
emu-museum@host[2] emureg copy-group Staff Volunteer
Copied 50 of 50 entries
emu-museum@host[3] emureg list-groups
Admin
Archives
Conservation
Staff
Volunteer
emu-museum@host[4] emureg list-group-entries Volunteer | head
Group|Volunteer|Table Access|
Group|Volunteer|Table|Default|Column Access|Default|
Group|Volunteer|Table|Default|Lookup|Default|
Group|Volunteer|Table|Default|Operations|
Group|Volunteer|Table|eaccessionlots|Column Access|AcqMeetingDate|
Group|Volunteer|Table|eaccessionlots|Column Access|AcqMeetingTitle|
Group|Volunteer|Table|eaccessionlots|List Columns|Meeting details|
Group|Volunteer|Table|eaccessionlots|List Columns|Owner|
Group|Volunteer|Table|eadmin|Admin Task|Generate Random Record Numbers|
Group|Volunteer|Table|eadmin|Admin Task|View Other Notifications|
emu-museum@host[5] emureg list-users --show-groups
charlie: Staff
emu: Admin, Archives
lucy: Conservation
snoopy: Archives
emu-museum@host[6] emureg add-user patty Volunteer
emu-museum@host[7] emureg list-users --show-groups
charlie: Staff
emu: Admin, Archives
lucy: Conservation
patty: Volunteer
snoopy: Archives
emu-museum@host[8] emureg rename-user --force patty lucy
Error: the user 'lucy' already exists
emu-museum@host[9] emureg rename-user --force patty sally
Updated 1 of 1 entries
emu-museum@host[10] emureg update-user-groups sally Conservation
emu-museum@host[11] emureg list-user-groups sally
Volunteer
Conservation
emu-museum@host[12] emureg update-user-groups --remove-group --verbose sally Conservation
Old groups: Volunteer, Conservation
New groups: Volunteer
emu-museum@host[13] emureg remove-user --force sally
Removed 1 of 1 entries
emu-museum@host[14] emureg remove-group --force Volunteer
Removed 50 of 50 entries
Tip: Invoke the emureg --help option to display usage information.
The Thesaurus tab displays in the Thesaurus module Ribbon in all screen modes:

|
Group |
Command |
Description |
|---|---|---|
|
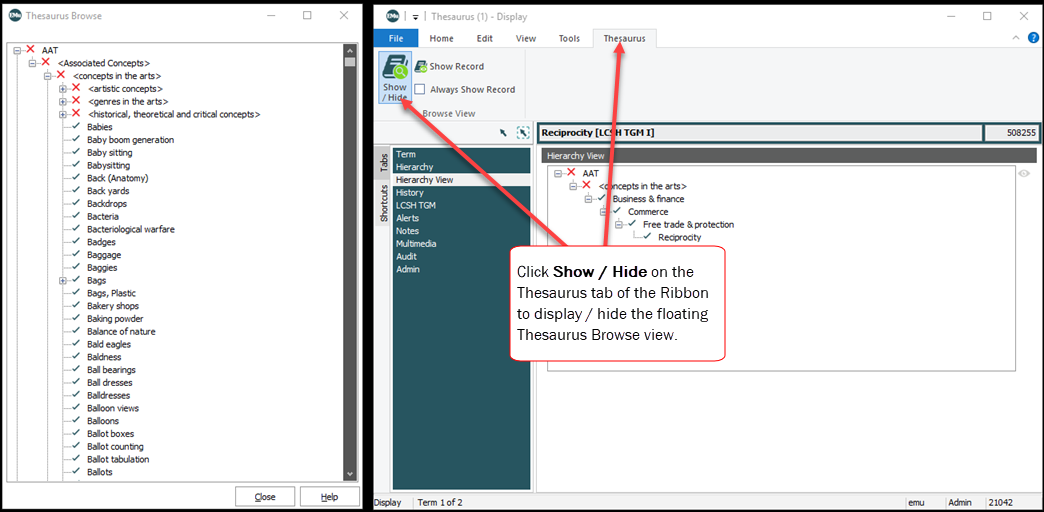
Browse View |
Show / hide the Thesaurus Browse View free floating panel. Browse View is a floating panel providing a hierarchical view of all loaded thesauri. It interacts seamlessly with other modes (Search, Display and Edit), views (List, Contact Sheet, Page and Details) and with the Hierarchy View tab. By default the panel displays to the left of the module, but it can be moved to any where convenient: |
|
|
When selected, the term for the current record in the main module window will be located and shown in Browse View and will become the primary selection. If the term appears in multiple branches in the Browse View hierarchy, each instance of the term will be selected. |
||
|
Click to enable. When enabled, as the current record changes in the main module window (e.g. by clicking a row in List View, or navigating through records in Details View), the term for the current record will be located and shown in the Browse View hierarchy and will become the primary selection. If the term appears in multiple branches in the Browse View hierarchy, each instance of the term will be selected. |









 beside the Hierarchy field.