As with any other report, the first step is to build the report in EMu.
Note: For full details of how to create the report in EMu, see Step 1: Create the report in EMu.
Note: Ensure that Microsoft Word is closed before creating a new report.
In the Loans module in EMu:
- On the Report Type tab of the Report Properties box, select Microsoft Word from the Type drop list.
- Select the Fields tab.
 Add the following fields
Module
Field Name
Column Name
Loans
Commencement date
DatLoanCommencementDate
Completion date
DatLoanDueDate
Internal Record Number
irn
Loan number
InfLoanNumber
Number of objects
ObjNumberOfObjects
Credit Line
InfCreditLine
Parties
(Borrower)
First: (Person Details)
NamFirst
Last: (Person Details)
NamLast
Salutation: (Derived Names)
NamSalutation
Organization: (Organization Details)
NamOrganisation
Street: (Postal Address)
AddPostStreet
Street: (Physical Address)
AddPhysStreet
City/Town: (Postal Address)
AddPostCity
City/Town: (Physical Address)
AddPhysCity
State/Province: (Postal Address)
AddPostState
State/Province: (Physical Address)
AddPhysState
Postal/Zip Code: (Postal Address)
AddPostPost
Postal/Zip Code: (Physical Address)
AddPhysPost
Position: (Organization Details)
NamPostion
Department: (Organization Details)
NamDepartment
Catalogue
(Objects Loaned)
Internal Record Number
Irn
Summary Data
SummaryData
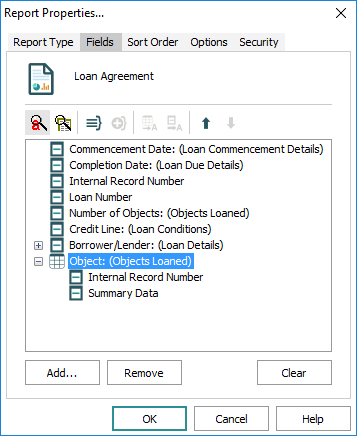
The Fields tab will appear similar to:

For details about adding fields see 2. Select the fields to include in the report: the Fields tab, where you will find an explanation for how to convert table fields (indicated by a
 icon beside the field name) to text using the Table as Text
  option. Converting a table field to text greatly simplifies the coding required to include its data in a report: when a table field is converted to text its data is included in the main
 .csvfile generated when the report is run in EMu, rather than being exported as a separate.csvfile.Note: Fields that are both an attachment field AND a table of values - Object: (Objects Loaned) in the example above - CANNOT be included in the main
.csvfile using the Table as Text option. In this case it is necessary to add additional Visual Basic Code to the mail merge report in order to include data from the additional
 .csvfile(s) in the report. We look at how to do this later. - Run the report in EMu.
When we run this report two .csv files will be generated:
eloans.csv(which is the main.csvfile and contains data from the Loans and Parties modules)ObjObjec.csv(which contains data from the Catalogue module)
We will look at creating a report where:
- Only one
.csvfile is generatedIn this example, we use the main
.csvfile (eloans.csv). In the majority of cases in which only a single.csvfile is generated when a report is run out of EMu, the steps described here are all you will require to create a mail merge report. At this stage the report will include details about the loan and the borrower (but not the objects loaned).Note: The steps described here for connecting to the DSN are required whether you have one or more than one
.csvfile to access. - More than one
.csvfile is generatedWe will then adapt our report to access data included in the second .csv file (ObjObjec.csv) in order to include details about the objects loaned.

