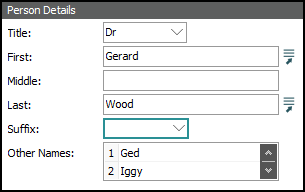
Tables are used where a field can hold multiple values. There are simple tables, such as the Other Names: (Person Details) field in the Parties module:

This table can hold multiple values (a person could have many Other Names). There is only one column in this table, and each row holds a single value.
There are also more complex tables, such as Associated With on the Associations tab of the Parties module:

In this case there are multiple columns in the table and each column holds different details, thus each row in the Associated With table can hold multiple values.
There are two types of table in a module:
- Those in which data is entered directly into the table: Direct data entry table.
- Those which summarise data entered in associated fields: Associated field tables
The Associated With table in the Parties module is an example of a Direct data entry table:

We enter values directly into the cells of a Direct data entry table:
- Click a cell and type directly into it.
- If an attachment can be made from a cell (Party in the table above), the Attach
 button to the right of the table will be enabled when the cursor is placed in the cell.-OR-
 - Select a value from a Lookup List
 Also known as a Pick List or Authority List, a Lookup List is a list of the values that have either been used or are suggested for use in a field. Rather than keying a value into the field, it is possible to pick a value from the Lookup List; the selected value will populate the field..
 When the cursor is in a cell that has a Lookup List (Role in the table above), the Lookup List
 button to the right of the table will be enabled.
 - To add a new row, simply enter data into the row with the asterisk (the last row in the table).
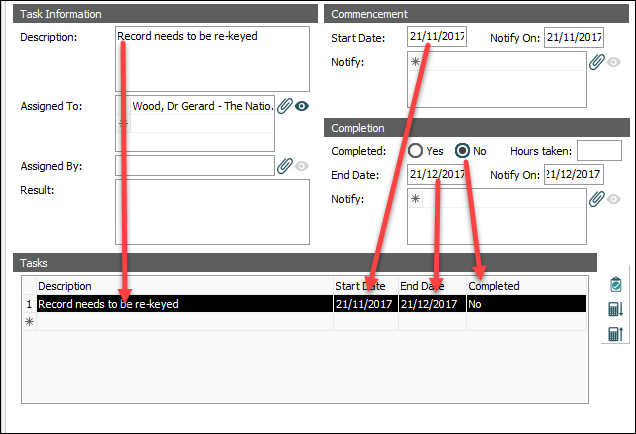
An Associated field table is a read-only table (it can't be edited directly) which automatically displays data as it is entered in other fields. The Tasks table on the Tasks tab is an example of this. When a value is entered in the Description: (Task Information), Start Date: (Commencement), End Date: (Completion) and Completed: (Completion) fields, the Description, Start Date, End Date and Completed fields in the Tasks table are automatically populated with the same value.

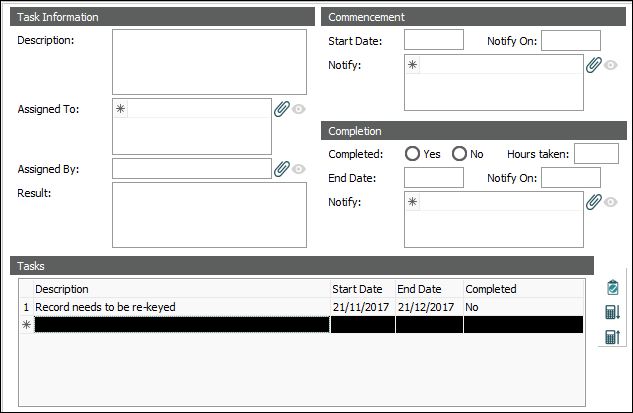
To add a new row (for an additional task in this example), click the row with the asterisk:

The values in the fields above are cleared, ready for new data entry.
Note: To display the Task 1 values (the first row in the Tasks table) in the fields above, simply select the row in the Tasks table.
A table cell must be selected before it can be edited. A cell can be in one of two edit modes:
|
Cell mode |
Description |
Achieved by: |
|---|---|---|
|
Highlight |
The value in a cell is highlighted and the cell has a dotted line around it, e.g. . Typing a value will overwrite the existing value. |
|
|
Cursor |
A blinking cursor is in the cell, e.g. Any value typed will be added to the existing value in the cell. |
Placing the cursor anywhere in a cell and clicking the mouse button. |
The following table lists commands for selecting cells, rows and columns in a table:
|
Select |
Do this: |
|---|---|
|
A single cell |
Press Right-clicking a cell will also select it and open a pop-up menu. |
|
A range of cells |
Select the first cell, press SHIFT and click the last cell in the range. |
|
All cells in a table |
Press Note: This command will not work in Cell Cursor mode. First select a cell. |
|
Non-adjacent cells |
Press |
|
An entire row |
Select the row number. Right-clicking a row number will select the row and also open a pop-up menu. |
|
An entire column |
Select the column heading. Right-clicking a column heading will select the column and also open a pop-up menu. |
|
Adjacent rows or columns |
Select the first row or column, press SHIFT and select the last row or column. |
|
Non-adjacent rows or columns |
Select the first row or column, press |
The following table lists commands for deselecting cells, rows and columns in a table:
|
To deselect |
Do this: |
|---|---|
|
A single cell |
Press |
|
An entire row |
Press |
|
An entire column |
Press |
|
Everything currently selected |
Press Note: Click any cell to clear all current selections and invoke Cell Cursor mode. |
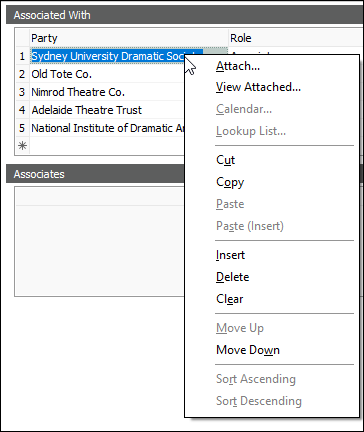
Tables support a right-click or Context menu.
To display the Context menu:
- Select a cell.
- Right-click the cell

The Context menu provides commands which can be used to manipulate the contents of the table. These commands include:
|
Command |
Description |
|---|---|
|
Attach |
Attach a record to the selected cell. |
|
View Attached |
View a record attached to the selected cell. |
|
Calendar |
Enabled for date fields: display the pop-up calendar. |
|
Lookup List |
Display the Lookup List associated with the selected cell. |
|
Cut |
Copy one or more selected cells to the Windows clipboard. The contents are stored in text, csv, HTML, BIFF (MS Excel format) and Axiell Format (Axiell internal format). The selected cells are then deleted. |
|
Copy |
Copy selected cells to the Windows clipboard. |
|
Paste |
Overwrite selected cells with the contents of the Windows clipboard. Only Axiell Format, csv and text clipboard formats can be pasted. |
|
Paste (Insert) |
Add new cells above the selected cells and paste the contents of the Windows clipboard into the new cells. |
|
Insert |
Add a new cell above the selected cells. |
|
Delete |
Delete all currently selected cells. |
|
Clear |
Remove the contents of the currently selected cells. |
|
Move Up |
Move all selected cells up one row. |
|
Move Down |
Move all selected cells down one row. |
|
Sort Ascending |
Sort the selected column in ascending order. All rows are adjusted. |
|
Sort Descending |
Sort the selected column in descending order. All rows are adjusted. |

 .
.