The management of a collection can involve a vast amount of information about collection objects / items, people and organizations, events, administration and more.
In EMu this information is stored in modules that are specific to the type of information (for instance, a Parties module stores information about people and organizations involved in some way with your collection). In a module window, users can search, display, report, sort, group, add and amend data within that module, all actions subject to a user’s security profile.
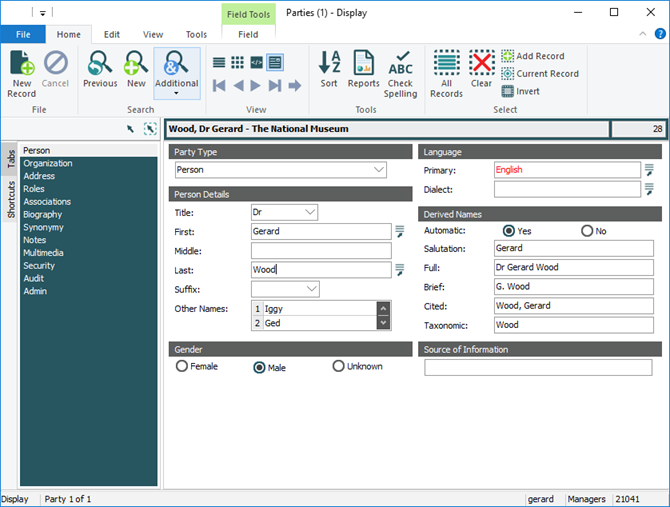
The purpose of each EMu module is described elsewhere. Here we look at each of the elements that make up a module window (click image to enlarge):
The Title bar names the module and indicates the current Screen mode. In our example above, the Title bar indicates that the Parties module is currently in Display mode.
More than one instance of a module can be open at once. Each instance is numbered, e.g. Parties (1), Parties (2).
The Title bar also contains the Minimize, Maximize or Restore, and Close buttons.
It can also include the Quick Access Toolbar (QAT) .
The Quick Access Toolbar (QAT) is a customizable toolbar that displays above (by default) or below the Ribbon (see below for details).
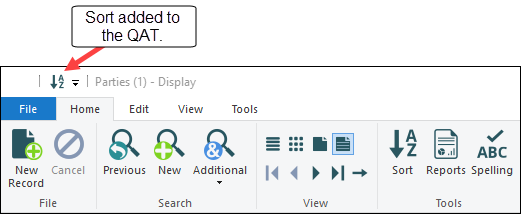
It is possible to add individual commands and entire groups of commands to the QAT:
- Individual commands, Sort in this example:
- Entire groups of commands, e.g. Edit (which includes commands such as Undo, Redo, Clear, etc.):
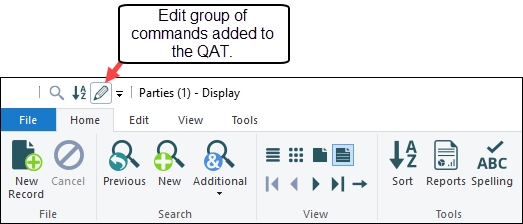 .
.Click the group icon in the QAT to access the commands in the group:

Tip: Hold the mouse cursor over a button in the QAT to display the button's descriptive label.
Note: If a button in the QAT is greyed out (faded), it is unavailable as its function is not currently relevant (before a search has been run for instance, the Sort button is greyed out as there are currently no records to sort).
There are two ways to add individual commands to the QAT:
- Click the Customize QAT button to reveal a list of available commands.
- Select a command in the list:
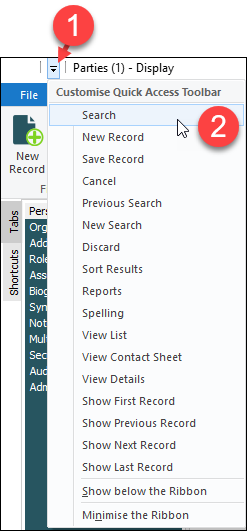
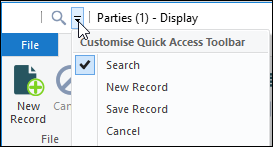
The command is added to the QAT; a tick in the list indicates that a command has been added to the QAT:
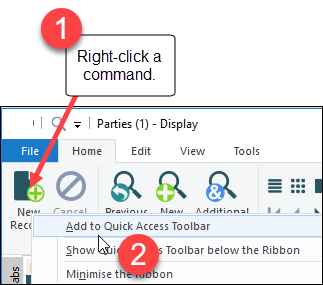
The commands list does not include all commands available in the Ribbon. To include any command in the QAT, right-click a command in the Ribbon and select Add to Quick Access Toolbar from the context menu:
Entire groups of commands are added to the QAT with the QAT context menu:
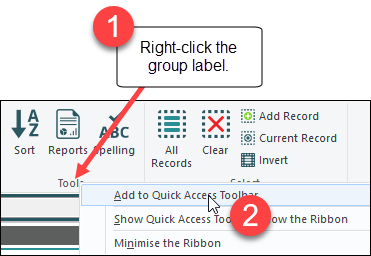
- In the Ribbon, right-click a group label (Tools in this example).
- Select Add to Quick Access Toolbar from the context menu:
To remove any command / group of commands from the QAT:
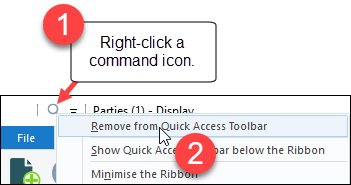
- Right-click an icon in the QAT.
- Select Remove from Quick Access Toolbar from the context menu:
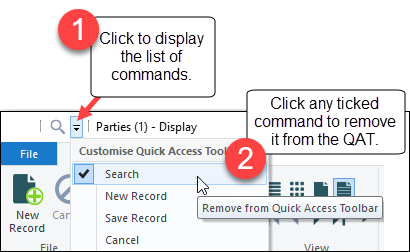
Alternatively, if a command is included in the QAT commands list, you can remove it from the QAT by clicking it in the list (this toggles the tick on /off):
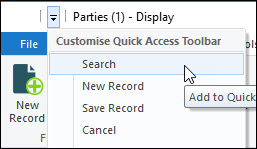
The command is removed from the QAT and the command is unticked in the commands list:
By default the QAT displays above the Ribbon. There are several ways to move it below the Ribbon:
- Click the Customize QAT button.
- Select Show below the Ribbon from the menu that displays:
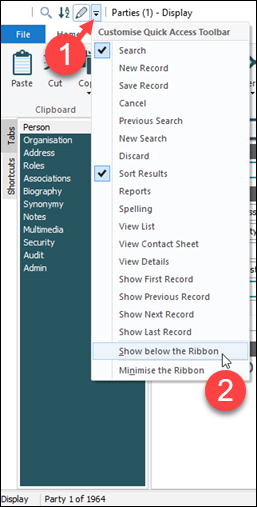
The QAT displays below the Ribbon:

Alternatively:
- Right-click any button or label in the Ribbon.
- Select Show Quick Access Toolbar below the Ribbon:
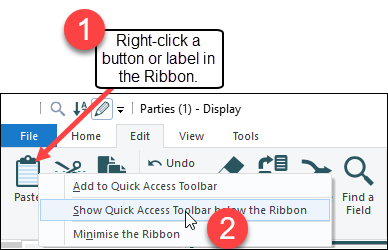
| Menu Option |
Description |
|---|---|
|
Add / remove a button from the QAT |
Add / remove a command from the QAT by clicking it in the list of available commands. A tick displays beside any command added to the QAT. Details above. |
|
Show below / above the Ribbon |
The QAT can display above or below the Ribbon. By default it displays above the Ribbon. It can be relocated by selecting this option from the context menu. Details above. |
|
Minimize the Ribbon |
Select this option to minimize the Ribbon (which will then display similarly to a traditional Menu bar). Maximized Ribbon: Minimized Ribbon: See Ribbon below for more details. |
The Ribbon is a common feature of modern Windows applications, and it replaces the Menu bar and Tool bar used in older versions of EMu. The Ribbon organizes commands into tabs (Home, Edit, View, Tools, etc.) and within a tab into logical groups of commands (Search, View, Select, etc.).
Which commands are currently available in the Ribbon depends on whether you are searching, adding a new record, displaying records or editing a record (see Screen mode for details).
For example, in Search mode the Home tab on the Ribbon includes these few options (click image to enlarge):
Once records have been returned by a search, retrieved from a group or added, the Home tab includes many more options:
Note: If a button is greyed out (faded), it is unavailable as its function is not currently relevant (for instance, the Cancel button is greyed out until an action that can be cancelled has been performed).
The Ribbon can display similarly to a traditional Menu bar by collapsing it:
The simplest way to collapse the Ribbon is to click the Collapse icon on the right side of the Ribbon:

The icon will toggle from Collapse  to Expand
  . Click the latter to return the Ribbon to its full size.
See The Ribbon for a description of all available commands.
The What's this? button  can be used to:
- Launch the Field Level Help to obtain a range of useful information about a field.
To access Field Level Help:
- Click
 .
. - Click a field.
See Field Level Help for details.
- Click
- Launch the EMu Help to display details about an item (such as the Ribbon) in the module window.
To launch the Help:
- Click
 .
. - Click an item (but not a field) in the module window.
- Click
A brief summary of a record displays here. The information displayed is drawn from one or more of the module's fields.
The record's Internal Record Number![]() A unique identifier automatically assigned when a record is created., its IRN, displays alongside the Summary Data.
A unique identifier automatically assigned when a record is created., its IRN, displays alongside the Summary Data.
Summary Data and the IRN only display when a single record is open in Details View.
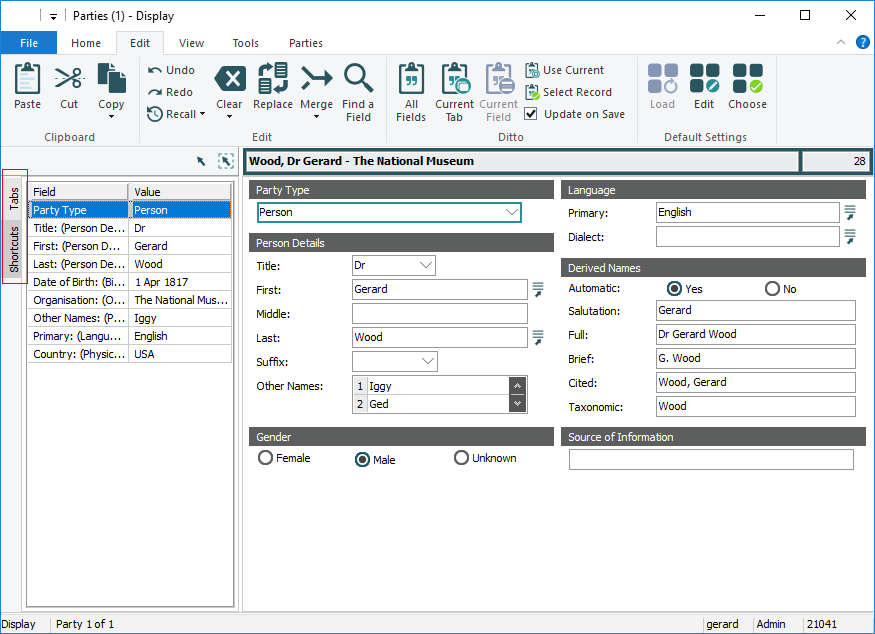
The left pane displays at all times. It can list all tabs in the module or a subset of fields from the module. Display the Tabs or Shortcuts list by selecting its label:
- Tabs: a list of all tabs in the current module.
Display a tab in the Display pane by selecting its name in the Tabs list.
In the module shown at the top of this page, Person is selected in the Tabs list and the Person tab is shown in the Display pane.
Tip: You can change the order of tabs in the Tabs list by dragging and dropping a tab name to a new position in the list. The order of tabs can be different for Search and Display screen modes. Changes that you make to the order of tabs are saved with your account and recalled next time you log in to EMu. See Allow Tab Reorder Registry entry for more details.
 Details about Tabs
The information held within a module is organized into logical groupings on tabs. For example, the Parties module holds details about all people and organizations involved in some way with your institution's collection. Within the Parties module there is a tab for recording a person's name (Person tab), another for address details (Address tab), another for details about a person's roles (Roles tab), and another for recording biographical details (Biography tab), and so on.
Note: As information is entered into certain fields the tabs available will adjust automatically. This is called Tab switching.
There are several ways to move from one tab to another:
- Select a tab name in the Tabs pane.
- Use a keyboard shortcut:
CTRL+SHIFT+[the leading letter of the tab label].For example, to move to the Roles tab you would select
CTRL+SHIFT+Rtogether.Tip: If there are several tabs with the same leading letter, keep selecting the key combination until the desired tab displays.
- Use the Tabs drop list on the View tab of the Ribbon:
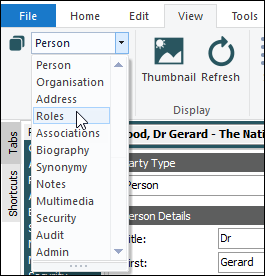
Tip: It is possible to move the cursor from one field to the next on a tab by pressing the TAB key on your keyboard. Press SHIFT+TAB to reverse the direction.
- Shortcuts: a subset of fields in the current module.
View values in fields (from any tab) and navigate to a field by double-clicking it in the Shortcuts list.
 Details about Shortcuts Lists
A Shortcuts list is a list of fields from any tab in the current module. If there is a value in any of the listed fields, it will display in the Value column of the Shortcuts list:
In this example, the Shortcuts list includes fields from the Person, Organization and Biography tabs. As you move through a set of records, the Value column of the Shortcuts list will update with values in the current record.
There can be one or more Shortcuts lists available in a module, each with a different subset of fields. To change which Shortcuts list is used:
- On the View tab of the Ribbon, select Choose in the Shortcut Settings group of commands.
The Shortcuts box displays with a list of existing Shortcuts.
- Select a Shortcuts List from the Shortcuts box and click OK.
Details about how to select, create and modify a Shortcuts list can be found here.
 Tips
Tips- If you want to check the values in fields across multiple tabs and multiple records, use a Shortcuts list. Search for records and then move through the record set; as you do so, the Value column will display values for all fields in the Shortcuts list for the current record.
- Double-click a row in the Shortcuts List to move directly to the field.
- When using the Shortcuts pane, you can move to any tab without switching to the Tabs pane: there is a Tabs drop list on the View tab of the Ribbon.
- You can specify colours for values and field names in the Shortcuts pane on the Shortcut List tab of the Options box.
- On the View tab of the Ribbon, select Choose in the Shortcut Settings group of commands.
As tabs and fields only display in Details view (as shown in the previous image), if you are in a List, Page or Contact Sheet view when you click a tab in the Tabs pane or field in the Shortcuts pane, the module will switch to Details view.
The Status bar displays at all times with a range of details about the current session and activity:
| Session details | Description |
|---|---|
|
User |
The user currently logged into EMu. |
|
Group |
The group to which the current user belongs. |
|
Service |
The name or some other identifier for the environment (database) that the current user is logged into (this may be a number, e.g. |
| Activity details | Description |
|
A Screen mode is the module's current mode of operation, of which there are four:
As you interact with a module, the screen mode changes automatically. The module shown at the top of this page is in Display mode; if we were to make a change to the current record, the Status bar would automatically show that we are in Edit mode; and if we began a search, the Status bar would indicate that we are in Search mode. |
|
|
Whenever one or more records displays in the module (i.e. you are no longer in Search mode), the number of records currently displaying is indicated in the Status bar. Tip: Unless you performed a search to return all records, the number of records currently displaying is a subset of records available in the module. In List and Contact Sheet views, the total number of active records is shown, e.g.:
In Details and Page views the current record
In this case, as you move forward to the next record, the Status bar will update to:
|

